For Latest Tips, Tricks, Links and many more......to your Mobile Inbox .

Just Type From Your Mobile -


JOIN Internet_Hacker ~send to~ 567678

& also

ON Tricks_and_Tips ~send to~ 9870807070

Don't Miss It.... Join With us Today.......

(For Indian Mobiles)
Innovative PPC platform.
Showing posts with label Tips n Tricks. Show all posts

SET UP GMAIL ON S60 MOBILE PHONE

  • Google provides us a service, called GMail Mobile, where we can access GMail account using web browser in our mobile phones. Actually, as S60 phone users, you don’t need web browser and GMail Mobile to access your GMail account. You can use Messaging application and download your messages to your phone using POP3 protocol.
  • Which method is better, using web browser or POP3?
  • Each of us has our own preferences. I myself would prefer POP3 because I can download my messages to my phone. Later when I need to read my email again, I don’t need to connect to the Internet. Once again, it is just a matter of taste. You can compare it with accessing email using Outlook/Thunderbrid and Web-based email.
  • How can you setup GMail mailbox on your S60 phones?
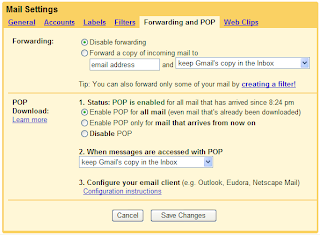
  • Firstly, you need to enable POP access on your GMail account. Logon GMail and click Settings Forwarding and POP.
  • Enable your POP Download by selecting “Enable POP for all mail” or “Enable POP only for mail that arrives from now on”.
  • I would also recommend selecting “keep GMail’s copy in the Inbox” so that you can still access your email from the web interface.
  • Next, you need to setup a new mailbox in your S60 phones. Launch Messaging application.
  • Select Options Settings E-mail Mailboxes. When the phone ask to create a new mailbox, Select Yes. If you have already a mailbox, the phone will not ask you to create a new mailbox. In this case, select Options New mailbox. Enter the following information for your new mailbox (note that some S60 phones might have different menus and labels):


  • Mailbox name: GMail
  • Access point in use: [Select Access Point of your operator](for airtel:mobile office)
  • My e-mail address: [Enter your Gmail address]
  • Outgoing mail server: smtp.gmail.com
  • User name: [Enter your GMail address]
  • Password: [Enter your GMail password]
  • Incoming mail server: pop.gmail.com
  • Mailbox type: POP3
  • Security (ports): On (SSL/TLS)
  • Port: Default (993/995)Note: On some S60 devices, you have to specifically enter port number. In that case, enter 995 as port number for POP3.If you need to enter port number for SMTP too, then use 465.
[gmail_mailbox.png] . . . . https://blogger.googleusercontent.com/img/b/R29vZ2xl/AVvXsEgAuAiv4FNpdrye_BGrWX0S81-5mqaevUvNLPCdVNDKxDOe7LIK-OJqxfDAOv8aI8aq6omT45ANp_0W-WY_1K-DotkxfSPdS1zUg7v1vlWa356UIY-shNeNQvAEgUjh8wLV_DhgjmDrcGuA/s200/gmail_security_port.png

`
[gmail_email_address.png] . . . . [gmail_pop3.png]

`
https://blogger.googleusercontent.com/img/b/R29vZ2xl/AVvXsEjjmjMUl668QEkV2nIpJdCgzEj53DG4iLQ4gw4FhTy9sp8_hsB_rYxVKF08J-_nrb_fofHTSW7RxCLJZdx6j_cxLs2c8avPMJzvvwfzVObquqVcAGEztpt4JoXqfrKVzjy6mMoUWkXUOn43/s200/gmail_messaging.png . . . . [gmail_smtp_server.png]

  • There are actually some other settings you can set, for example your name, signature, etc.
  • Now you are ready to go. If you go to the main menu of Messaging application, you should see your GMail mailbox there. You can download your messages or write new messages.
[gmail_pop_server.png]

Please write in your comments;so that i would know what you need & wat problems do i hav in my blog. (NOTE :If you want to avoid 6630 giving you untrusted site warning, use pop.googlemail.com instead of pop.gmail.com.

This may apply to other S60 phones.

Laptop Operating Temperatures

I was afraid of laptop operating temperatures for a long time, and I still have that fear of burning hot laptops. I know, I know, the latest processors are much cooler than the ones laptops used about a decade ago, but that's not the main issue. Have you ever wondered about health issues that can be closely related to the laptop operating temperatures? Probably not, so here's the story...

Laptop Operating Temperatures

If you’re one of the males using a laptop, various studies conducted a few years ago have shown that you may want to get a cool one. No, not necessarily a cool laptop computer like the MacBook, but a cool one like any laptop that doesn't get hot... Why that?

Well, these studies found that, as long as the laptop operating temperatures are high, the result is an excessive amount of heat being transferred to the scrotum, and ultimately affecting the quality and quantity of the user’s sperm. So that's why Peter North doesn't have a notebook, now I finally know the answer!

Now, don't throw away your hot laptop, because this only happen when you are using it on your lap. Simply place it on a desk, and everything should be fine, but...

...what are the best laptop operating temperatures?

Well, some may tell you to get a certain program to find out how hot is your laptop, get some additional cooling, and so on, but I am not one of those. As long as your laptop runs fine, it doesn't really matter how hot it is, as long as it's not outside the warranty period. Just be sure to always backup your precious data, because we all know that laptop operating temperatures are higher than those of desktop computers, so breakdowns are more frequent.

These being said, remember there's no such thing as best laptop operating temperature. If it works, be happy with it and backup on a daily basis. Good luck

How to Unlock memory card when you forgot your memory card password


Some times it happens that you forgot the password of your memory card and you have lots of your important data in your phone.
So there are two types of methods for recovering the password of your memory card with the help of nokia phone.

For Nokia s60 1st and 2nd edition phones.


1.
First Install FExplorer in your phone memory.
2. Got to drive C: , you will find a file called mmcstore
3. Send it to your pc directly and open it in notepad or rename the file.
4. At the end of the file you will find your password.

For Nokia S60 3rd Phones, Nokia N-Series and Nokia E-Series

  • There is almost no way yet known to hack the memory card password in case of these types of phone but there is a way to do it some of the s60 3rd edition phones and almost all the E-series phones.
  • The remote lock option in E-Series phone allws you to unlock your phone by sending a sms.
  • The only thing you have to do is to activate this feature by going to Tools--> Settings--> Security-->Phone and SIM-->Allow remote lock menu. The password of your memory card will be your remote lock message.
  • So you have to just send a sms containing your remote lock message that will automatically change your memory card passsword.

Enjoy It..........

Top 10 ways to Tweak your Windows Xp

Today I am going to share few tips how to Improve your Windows Xp Appearance.We all Like to work if our working Platform is Attractive.As I have already mentioned in my Profile that I spend most of the time in collecting Softwares.I use few Utilities to make the Windows Platform Attractive.

Got bored with Same old Xp Themes and Boot Screens and Logon Screens ?
I am going to discuss briefly about 10 different ways to Tweak your Xp and Make it totally different from Others.

See the Screenshot my Windows Xp..


1.How to change the Windows Boot Screen?
2.How to Change windows Logon Screen?
3.How to Change Windows default Icons to your Custamized Icons ?
4.How to use an attractive Xp Themes ?
5.How to set Background Picture for a Drive ?
6.How to Change Cursor ?
7.From where to get Best Wallpapers ?
8.How to Change Windows Startup Music and Shutdown Sound?
9.How to set Dock in Xp ?
10.Place Background Picture for Windows Explorer & Internet Explorer.

Ok Lets us Start our Work one by one:

1.How to Change Windows Boot Screen?

  • First of all Download Tuneup Utilities.
  • Open Tuneup Utilities --> Tuneup Styler --> Change Windows Xp Boot Screen
  • You can create your own Boot Screen by Clicking on Add -- > Load Boot screen from File
  • Browse for an Attractive Picture and Click Save Boot Screen Option .

See here I have Created My Own boot screen.


You can also Download Boot Screens from here
http://www.wincustomize.com/skins.aspx?libid=32

2.How to Change windows Logon Screen?

  • Here also we are going to use Tuneup Utilities.
  • Download Welcome Screen from here
  • http://www.wincustomize.com/skins.aspx?libid=26
  • Open Tuneup Utilities --> Tuneup Styler --> Select Windows Xp Welcome Screen
  • Click Add and select the downloaded the Welcome screen

See here this is my Logon Screen


Thats it !!! Press ( Window Key + L ) to view your Welcom screen

3.How to Change Windows default Icons to your Custamized Icons ?

  • Here also we can use Tuneup Utilities.But if we use Stardock Icon packer it would be better.
  • Download the Icon Packages.
http://www.wincustomize.com/skins.aspx?libid=2


  • Open Icon Packer Click Install new Packages -->Install from Disk -->Browse the Downloaded Icons
  • Double Click on Icons click Ok.
  • Now you can Find your Xp Icons are Totally changed according to your Style.

4.How to use an attractive Xp Themes ?

  • Here you can either download Xp Themes from here and Apply.
  • Else you can use Windows Blind
  • If you use Windows Blind.Check this Link to Download Themes of Your Taste.
  • http://www.wincustomize.com/skins.aspx?libid=1
  • Double Click on Downloaded Theme to install.
Open Windows Blind Apply your Theme.

To change your Animations See below Screenshot:


Change the Animations & Toolbars for your Theme.


5.How to set Background Picture for a Drive ?

See below screenshot I have given Background Picture for a drive.


Its very simple.
Open Notepad.Copy(Ctrl+c) and Paste(Ctrl+V) the Below things in Notepad.


[{BE098140-A513-11D0-A3A4-00C04FD706EC}]
IconArea_Image ="c:\Your Picture Address Location here.jpg"
IconArea_Text= 0x00FFFFFF

ok now Save this File as "desktop.ini".
Copy this desktop.ini File to your Drive.
Note : According to Picture Format Change your Pic Extension as .jpg
or .bmp


6.How to Change Cursor ?

  • Download Cursor Xp.
  • You can also Download Cursor Pointers of your Taste from here.
http://www.wincustomize.com/skins.aspx?libid=25

7.From where to get Best Wallpapers ?

*Google Image Search is Best way for Wallpapers.
*Download 1024*768 Size wallpapers for Better resolution.
*This Devianart site also has got Different and Unquie Wallpapers.


9.How to set Dock in Xp ?

Use these Docks to arrange Icons in Desktop in any designs
Stardock ObjectDock Plus 1.90
Circle Dock - Drag and drop your files folders


10.How to Place Background Picture for Windows Explorer & Internet Explorer?

See the Below screenshot i have Placed a Background Picture for my Windows Explorer


Download Ace Utilities 1.7 from here
Open Ace Utilities -- > More Tools --> Tweak Plus (Shortcut Key CTRL+T)
Browse to Tab Explorer
Click Browse to set background Picture for Windows Explorer
Note:You can Only Place Bitmap Images.

Tips: Suppose u have got .jpg image open it with Paint.
File --> Save as -->24bit .bmp image format.
Then you can use that Picture as Background.


I Hope these Tweaks will be Useful to you.

How to increase your Laptop Battery's Life?

http://talklaptops.info/wp-content/uploads/2009/02/battery.png

Dear friends you have read many interesting tips from my site and I think you have gained more knowledge from them. Now I have a more interesting tip to increase your Laptop's battery life. There is no matter, laptop manufactures gives you the guarantee about the battery that how long it works. The battery of laptop always stops working very early at some stage in essential research, just like when you are watching a DVD movie.

Follow the few steps to increase the laptop battery's life:


Lower the backlighting on your screen.

The screen of your Laptop takes up significant amount of power and you do not require its maximum brightness. You should have to check your system and decrease the screen brightness it to a comfortable point.


Stop your wireless signal when you are not using.

After turning off your Laptop can save max. 20 minutes of your laptop's battery time because WiFi can use a considerable quantity of power. By right clicking you can stop your WiFi signal when you are not using.


Manage the correct power scheme in XP

Windows XP contain a number of predetermined power plans, which control settings like how rapidly your laptop turns off and when your screen saver boots in. You can change your laptop power scheme by choosing Control Panel > Power Options. For max. Battery life from the "Power scheme" chooses the option "Max. Battery" and decline the list. There are good choices for you just like "Low Power Mode" and Portable /Laptop. They don't conserve as much power as Max Battery. After selecting a power scheme you click Ok button to finish the process.

Basics of SE phone- IMEI; CID; EROM; CDA; GDFS

Here I give some basics of Sony Ericsson Phone link IMEI; CID; EROM; CDA; GDFS read this carefully before your going for any flashing, modding, costomizing.

CID
= This "number" defines the version of SE's protection present in the phone.New CIDs are deployed from time to time, for the sole reason of preventing them from beeing unlocked/flashed/tampered with by non-SE service tools. Current CIDs in use by SE are 29/36/37/49/50/51/52/53. SE-based LG/Sharp phones use the same system (but different versions). The OTP (One Time Programmable memory) and EROM of a phone might be protected by different CIDs, usually the case in newer K600s/K608s.

CDA = This "number" defines which variant of a specific firmware a phone is supposed to have. It lets, among others, SEUS (Sony Ericsson Update Service) know which language-pack/branding/bandlocks a phone is to be flashed with. A generic (unbranded) K750 for use in Scandinavia will be CDA102337/12, whilst a Telenor-branded K750 will be CDA102338/62. Both will be flashed with the same languages/dictionaries, but the latter will be flashed with Telenor-branded firmware.

BLUE/BROWN/RED:This "color" defines what kind of phone we are dealing with. BLUE phones have been assembled at the factory, but never been programmed with software/GDFS/IMEI (remember kids: the IMEI is stored in the OTP (One Time Programmable memory). BROWN phones are "developer phones", for testing. Less restrictions are present, as these are used for "debugging/beta" purposes. As of CID36, a phone has to be converted to BROWN to unlock it.RED phones are your typical retail ones.

GDFS:This is the phones "stash", where all settings and calibration data is stored (this also goes for the firmwares IMEI-resource as well as the SIMlocks). Similar to other brands use of NVRAM (Non-Viotile Random Access Memory).

IMEI = International Mobile Equipment Identity. A 15-digit number which includes information on the origin, model, and serial number of the device. The model and origin comprise the initial 8-digit portion of the IMEI, known as the "Type Allocation Code/TAC". The remainder of the IMEI is manufacturer-defined, with a "Luhn check digit" at the end (which is never transmitted). The "Luhn check digit" is calculated from the rest of the IMEI.
It should be noted that in SE-based phones, the IMEI is stored in two places, the OTP (One Time Programmable memory) and GDFS. The GDFS IMEI is normally read from the OTP, but this can be circumvented by SETool function to "change" the IMEI. This patches the firmware into allowing different OTP/GDFS IMEIs. It is the GDFS IMEI that is reported to the network, so changing this will "de-bar" blocked phones. SEUS is not fooled by this, on the other hand, and it should also be noted that doing this is illegal in most countries.

EMMA = Service software/solution by SE themselves. Protected by the EMMA smartcard to prevent non-licensed usage. Current version is EMMA3, though EMMA2 is still alive (but kinda useless on newer phones). The EMMA smartcard contains an algorithm that allows EMMA to communicate directly to/with the phones CID, so performing operations the way they were intended. The smartcard and its algorithm has not been cracked. Current EMMA access levels exists: Service Update - Can't unlock phones. Service Update Pro - Can't unlock phones. Network Operator - Can't unlock phones (but sure as hell can lock them ). Service Center Std - Can't unlock phones. Service Center Rc - Can unlock phones, as they have a special version of the smartcard with a CSCA key. Research & Development - Can unlock phones, as they have a special version of the smartcard with a CSCA key.

DB2000, DB2010, DB2020, DB3150 = SEMC (Sony Ericsson Mobile Communications) hardware platforms. It's something similar to chipset in PC. DB2000 (another name is Marita) is a GSM+3G (UMTS) capable platform, SE K600/K608/V600/Z800/W900, Sharp 802sh, 902sh, 903sh and LG 3G phones are based on it. DB2010/2012 (Marita compact) is GSM-only, non-3G, platform. Most not very old and modern SE phones like K300,K500,K700,K750,S700,W300,W550,W800,Z520,Z530 are based on this chipset. DB2020 is the newest product of SEMC. K800, K790, K610, Z710 etc, Sharp 904sh feature this most secure (from SE's point of view) platform.
Newer phones uses the DB3150 platform, K850, W910, etc...
Sony Ericsson Smartphones uses the DB2001 platform (need more info), Like the W960...

EROM = Extended ROM. This is the base part of the software which isn't flashed in normal update operations. It controls the flashing interface, the boot loader, etc.

FOTA = Flash Over The Air. The Sony Ericsson Remote Update Service is a convenient way to easily and remotely update your mobile phone to the latest available software version. This is done over the air; no connection to a PC is needed. The cost for using Sony Ericsson Remote Update Service is your operator's fee for transferring the data to your phone. This varies widely between different operators; if you are uncertain you should contact your operator. User content in the phone, such as images, music, ringtones and videos, is not affected by the update.

Customization = Changing or replacing original content of the phone, like ringtones, wallpapers, icons, themes, that come with branded or unbranded phones. It's nothing more than first default configuring of the phone after flashing FS file. Usually the process is:
1. Writing customize.xml and server & java certificates in /tpa/preset/custom in sonics folder to /tpa/presest/custom folder in the phone's internal file system
2. When the phone starts after flashing, it parses that xml file, puts settings written in that xml into the phone's GDFS and works out certificates (some go to Trusted certificates, some got Java certificate etc)
If you open customize.xml you can change almost any initial settings like time zone, date, internet profiles etc.

Branded Phones = Some network providers place their own ringtones, themes, icons, links etc within phone's software. (eg. vodafone/telenor, orange, t-mobile, rogers, cingular etc.) Debranding means removing all this content and restoring phone to it's original factory SONYERICSSON condition. This will not damage phone in any way! You will loose Operator Icons, and links, WAP, and MMS settings however these you can get via http://www.sonyericsson.com/spg.jsp?...=pg&tl=support
select region then PHONE SETUP.

Finalization = Completing flashing operations and storing basic settings that phone needs to properly operate.

Firmware has two parts:
1. FS: Containing languages, images, sounds, animations, settings, etc. Anything that isn't pure software.
2. Main: Containing the base system software.

LIST OF PHONE'S PLATFORMS:

pnx5230:
- W350, W380, Z310, Z555
DB2000:
- K600, K608, V600, V800, V802, W900, Z500, Z800, Z1010
DB2000 (PDA/Smartphones):
- G700, G900, M600, M608, P990, W950, W960, P1
DB2010:
- D750, J300, K300, K310, K500, K510, K700, K750, K758, S700, W300, W550, W600, W700, W800, W810, Z520, Z525, Z530, Z550, Z558
DB2012:
- K320, W200
DB2020:
- K530, K550, K610, K770, K790, K800, K810, K818, S500, T650, V630, W580, W610, W660, W710, W830, W850, W880, W888, Z610, Z710
DB3150 (A2):
- C702, C902, G502, K630, K660, K850, V640, W760, W890, W910, W980, Z750, Z770, Z780

Free GPRS Settings For Any Operator Network in World on your Mobile Phone

Get free GPRS settings for any operator/mobile in world on Your Mobile Phone:

If you feeling problem to setup gprs settings manually (given below or any other), or after calling many times to customer care they unable to solve your problem, then I have another solution for you. I'll send free gprs setting right on your mobile phones. You just have to provide this information:

Mobile No: +country code then your no, exp: +91-9861506174
Phone Model: any in the world, exp: Nokia N95 or SE W910i or China
Operator: your mobile operator (GSM only) name, exp: vodafone or O2
Country/region: name of country and region where form your no, exp: India-Delhi.

All this information you can send sms on the mobile : +91-9861506174 (plz do not call, I'm unable to handle your calls now, but it is a future project to provide in call support) and as soon as possible I'll send you free gprs settings. We are support gprs setting for mostly available handset like Nokia, Samsung, Sony Ericsson, Motorola, LG, windows mobile, smart phones and we are also support gprs settings for Chinese Mobile. So now onward don't waist your time in calling customer care of Vodafone, MTN, AT & T, Orange, Virgin, T-mobile, Virgin, idea, Airtel, bsnl, aircel, reliance smart gsm, O2, or any operator in the world. They ask many question but never satisfied a customer.
For better response and correct gprs settings plz provide all details. For exp you can give some extra details like: Postpaid or Prepaid, wap or web, for mobile surfing or for PC surfing, this make to delivered you to right gprs settings.
BSNL user plz specify zone, i.e. east,west, north or south zone.
Plz put your comments and ideas if you satisfied or not with the service. Some operators not supports third party service, so if you unable to receive settings it may your operator issue.
Due to high volume of requests, it may take some time to receive gprs settings. Plz be relax, you definitely got.

====================================

Free manual GPRS settings:
Most of people have face problems regarding gprs settings on their mobile phones. I have been getting lots of public reviews about how to configure and where to get gprs setting, So I publish here most of gprs settings for most of mobile service operator (India) to enter in your phone mannulay. Here you have manual gprs settings for vodafone, hutch, idea, airtel, bsnl, airtel live, airtel mobile you can enter in your phone and configure mannually.

Manual Reliance Smart GPRS Settings:

Settings for SMARTWAP:

* Account name : SMARTWAP
* Access point name: SMARTWAP
* Home page: http://wap.rworld.co.in/gsm/index.wml
* Wapgateway proxy IP address: 97.253.29.199
* Port: 8080


Settings for SMATRNET:

* Account name: SMARTNET
* Access point name: SMARTNET
* Home page: http://www.google.co.in
* Wapgateway proxy IP address: 97.253.29.199
* Port: 8080


Settings for MMS:

* Account name: RTLMMS
* Access point name:MMS
* Homepage: http://10.114.0.5/mms/
* Wapgateway IP: 10.114.0.13
* Port: 9401

Manual Idea gprs Settings:

  1. Account Name - idea_GPRS
  2. Username - leave Blank
  3. Password - leave Blank
  4. Homepage - http://wap.ideafresh.com
  5. Proxy and Server Port - 8080
  6. Proxy and Server adress - 010.004.042.045
  7. Databearer - GPRS / Packetdata
  8. Acces Point Name - imis
  9. Proxy - Enabled/yes
  10. Authentication Type - Normal
Manual Hutch or Vodafone Essar gprs Settings:
  1. Account Name - Vodafone Live
  2. User Name - leave Blank
  3. Password - leave Blank
  4. Proxy - Enabled/yes
  5. Access Point Name - portalnmms
  6. Proxy - Enabled/yes.
  7. Proxy and Server address - 010.010.001.100
  8. Proxy and Server Port - 9401 or 8080
  9. Homepage - http://live.vodafone.in
  10. Authentication Type - Normal

Manual Airtel gprs Settings:

  1. Account Name - Airtel_gprs
  2. User Name - leave Blank
  3. Password - leave Blank
  4. Homepage - http://live.airtelworld.com
  5. Proxy - Enabled/yes.
  6. Proxy and Server Adress - 202.56.231.117
  7. Proxy and Server Port - 8080
  8. Data bearer - GPRS or Packet Data.
  9. Access Point Name - airtelgprs.com
  10. Authentication Type - Normal
  11. Use preferred access point - No

Manual Airtel live settings:

  1. Account Name - Airtel_live
  2. Homepage - http://live.airtelworld.com
  3. Username - leave Blank
  4. Password - leave Blank
  5. Proxy - Enabled/yes
  6. Proxy and Server Adress - 100.001.200.099
  7. Accespoint Name - airtelfun.com
  8. Proxy and Server Port - 8080
  9. Data bearer - GPRS/ Packet Data
  10. Authentication Type - Normal

Manual BPL gprs Settings:

  1. Account Name - BPL WAP
  2. Username - leave blank
  3. Password - leave blank
  4. Proxy - Enabled/yes
  5. Homepage - http://wap.mizone.bplmobile.com
  6. Proxy and Server address - 10.0.0.10
  7. Proxy and Server Port - 8080
  8. Acces Point Name - mizone
  9. Data bearer - GPRS/ Packetdata
  10. Authentication Type - Normal
Manual BSNL north gprs Settings:
  1. Account Name - bsnlwap
  2. Username - leave blank
  3. Password - leave blank
  4. Proxy - Enabled/yes
  5. Homepage - http://wap.cellone.in
  6. Proxy and Server address - 010.132.194.196
  7. Proxy and Server Port - 8080
  8. Acces Point Name - wapnorth.cellone.in
  9. Data bearer - GPRS/ Packetdata
  10. Authentication Type - Normal

Personalize Your Browser

http://people.mozilla.com/~cbeard/personas/personas-preview.png

Choose from thousands of useful Add-ons that enhance Firefox. It’s easy to personalize Firefox to make it your own.

An Add-on for Everyone:

You can choose from over thousands of add-ons at the Firefox Add-ons Web site. A Firefox add-on can help you comparison shop, share bookmarks with your friends, see the weather in a corner of your browser, write to your weblog, get news, listen to music - all from inside the browser you already love. You can even change the appearance of your browser - from buttons to colors and fonts - so that it matches your own personal style.

Add-ons Manager for Extensions and Themes:

The new Add-ons Manager improves the user interface for managing extensions and themes, making it even easier for you to customize Firefox 2. Install, uninstall, enable and disable your add-ons in a single place.

Free Download Firefox Here:

Firefox 3 is available in more than 45 languages as a release intended for developer testing and community feedback. It includes new features as well as dramatic improvements to performance, memory usage and speed.
To download English version free click here:
Firefox 3

The previous Firefox 3.0 Beta 5 on initial speed testing shows it to be the fastest browser available.

The other in
list of top ten Internet Browser as follows:
1. Firefox 3.0 Beta 4
2. Safari 3.1
3. Opera 9.50 Beta 1
4. Internet Explorer 8 Beta 1
5. Firefox 3.0 Beta 3
6. Safari 3.0 Beta
7. Opera 9.26
8. Firefox 2.0.0.12
9. Internet Explorer 7

How to Enable Cookies ->Privacy policies & Cookies

http://www.cartoonstock.com/newscartoons/cartoonists/mfl/lowres/mfln74l.jpg

Privacy policies & Cookies->

Privacy policy of a Web site tells you what kind of information the site collects, to whom it gives that information, and how it uses the information. Personally identifiable information is information that can be used to identify/contact you, such as your name, e-mail address, home/work address, or mobile/telephone number. However, a Web site only has access to the personally identifiable information that you provide, or to the choices you make while visiting a Web site.

For example, a Web site cannot determine your e-mail name unless you provide it. A Web site cant access to other information on your computer without you asks to do so. If a Web site collects personally identifiable information, it may store all the information in a cookie, a small file that it store on your computer.

Most of Web sites provide privacy statements as written documents that you can view on the Internet. Web sites also might provide a Platform for Privacy Preferences (P3P) privacy policy. If a Web site has a P3P privacy policy, your Browser can display it. A Browser also might be able to compare your privacy settings to a representation of the P3P privacy policy, and determine whether or not to allow the Web site to save cookies on your computer.

Simply A cookie is a file created by a web site that stores information on your computer, such as site-specific preferences when you visiting that site.

How to Enable Cookies ->

By default cookies are enabled. Uncheck this option to disable the use of cookies. Note that some sites may not work properly when cookies are disabled. To enable cookies, follow the instructions below for the browser version you are using.

Windows IE 6.x Browser ->

1. Select Tools

2. Select Internet Options

3. Select the Privacy tab.

4. Select Advanced

5. Deselect override automatic cookie handling button

6. Click on the OK button at the bottom of the screen.

7. Click OK to exit

8. Select Tools

9. Select Internet Options

10. Select Delete Cookies

11. Select Tools

12. Select Internet Options

13. Select Delete Files

14. Close down all open Internet Explorer Browsers

15. Load it back up again.

Windows IE 5.x Browser ->

1. Go to Tools on the menu bar

2. Pick Internet Options

3. Click the Security tab

4. Select the Custom Level tab

5. Under "Allow Cookies that are stored on your computer" click "Enable"

6. Under "Allow per-session cookies (not stored)" click "Enable"

7. Select OK, Yes you want to save the settings

Mozilla Firefox ->

1. Go to Tools on the menu bar

2. Then click on Options

3. Then select Privacy

4. Then check/uncheck box before “Accept Cookie from site” under Cookies to enable/disable cookie.

AOL 8.0 ->

1. From the AOL Toolbar, select Settings.

2. Select Preferences

3. Select Internet Properties (WWW)

4. Select the Privacy tab

5. Select Advanced

6. Deselect override automatic cookie handling button

7. Click OK to exit.

AOL 7.0 with IE 6.x ->

1. From the AOL Toolbar, select Settings.

2. Select Preferences

3. Select Internet Properties (WWW)

4. Select the Privacy tab

5. Select Advanced

6. Deselect override automatic cookie handling button

7. Click OK to exit.

AOL 7.0 with IE 5.5 ->

1. From the AOL Toolbar, select Settings.

2. Select Preferences

3. Select Internet Properties (WWW)

4. Select the Security tab

5. Select the Custom Level tab

6. Under "Allow Cookies that are stored on your computer" click "Enable"

7. Under "Allow per-session cookies (not stored)" click "Enable"

8. Select OK, Yes you want to save the settings

Netscape 7.x ->

1. Click Edit on the Toolbar.

2. Click Preferences

3. Click the Privacy and Security category; expand the list to show the subcategories.

4. Click Cookies

5. Three options are displayed. Click the appropriate choice:

o Disable cookies

o Enable cookies for the originating web site only

o Enable all cookies

o If you want to be notified when a web site tries to set a cookie, select "Warn me before accepting a cookie."

Netscape 6.x ->

1. Click Edit on the Toolbar.

2. Click Preferences

3. Click the Privacy and Security category; expand the list to show the subcategories.

4. Click Cookies

5. Three options are displayed. Click the appropriate choice:

o Disable cookies

o Enable cookies for the originating web site only

o Enable all cookies

o If you want to be notified when a web site tries to set a cookie, select "Warn me before accepting a cookie."

Netscape 4.x ->

1. Go to Edit on the menu bar

2. Pick Preferences

3. Go to the Advanced option on the Category menu

4. Click the check box next to "Accept All Cookies"

5. Click OK

Netscape 3.x Clients ->

1. Go to Options on the menu bar

2. Pick Network Preferences

3. Click the Languages tab

4. Click the checkbox next to "Enable Java"

5. Click OK

Mac IE 5.x ->

1. Click Edit

2. Select Preferences

3. Under the Receiving Files option, select Cookies

4. Under "When receiving cookies:" select the desired level of cookie acceptance

5. Under "When receiving cookies:" select the desired level of cookie acceptance

6. Click OK to finish
Pay Per Click Solutions - Increase your earnings

The Amazing World of Entertainment & Fun Stuff